Make It Monday | Square Bottomed Gift Bag

Make It Monday Square bottomed gift bag candles chocolate lipstick using A Whole Lot of Lovely from Stampin' Up!

Make It Monday

Hello! Welcome to this weeks Make It Monday!
A few weeks ago I attended a Crafty Retreat with 40 of my Stampin’ Sisters, and the next few Make It Mondays are things that have been inspired by project from that weekend. This particular project was inspired by a Swap I received from the lovely Jane Carroll.

Make It Monday Square bottomed gift bag candles chocolate lipstick using A Whole Lot of Lovely from Stampin' Up!

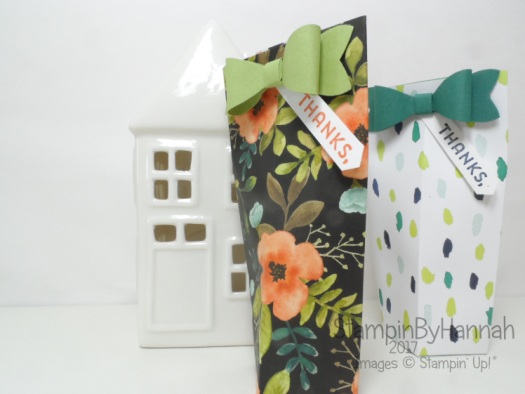
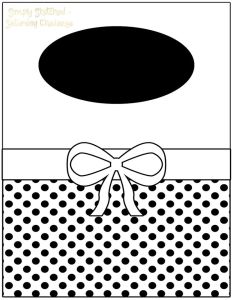
This fun mini gift bag starts off as a pretty standard bag, the trick is in the closing….. Instead of pinching the top, or punching a hole and threading some ribbon, the box is flattened. I have kept it closed with a staple, but you could us a clip or ribbon.

Measurements:

Designer Series Paper – 5 1/2 x 6″ (14 x 15.5 cm)

Score on the short side at: 1 1/4, 2 1/2, 3 3/4 and 5″ (3, 6, 9 and 12 cm)

Score on the long side at: 1 1/4″ (3 cm)

Make It Monday Square bottomed gift bag candles chocolate lipstick using A Whole Lot of Lovely from Stampin' Up!

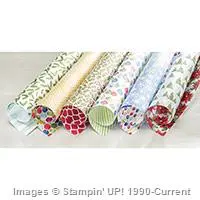
The Designer Series Paper for the black bag is from A Whole Lot of Lovely, while the white one is Naturally Eclectic. The sentiment is taken from Lovely Inside and Out.

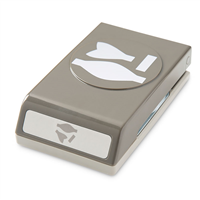
My favourite part of this bag though has to be those cute paper bows. They are super easy to create using the Bow Builder Punch; check the video for how I put them together. I do have a couple of tips though, I would use TomBow glue to stick them together (rather than the glue dots I used for speed in the video), and give the pieces time to dry before assembling the bow. Use a bone folder to create a natural bend in card stock, and use card stock rather than Designer Series Paper.


Product List


Christmas in July Join Stampin' Up! UK


Shop Stampin' Up! UK Teesside North East Stockton on Tees

Joining Stampin' Up! UK Starter Kit

To purchase any of the items featured in my projects please use the links above. To join my team of Stampin’ Friends select ‘Join My Team’ or send me a message!

Please support StampinByHannah, and enter my Code Club Code. For orders of over £150 please do not use this code, as you are entitled to your own Hostess benefits!

Sign up to my newsletter here – http://eepurl.com/2if59

Hannah McCurley

Stampin’ Up! UK Independent Demonstrator

Simply Sketched Saturday Challenge #3

Stampin' Up! UK Simple Sketched Challenge Season of Cheer

Stampin' Up! Sketch Challenge

Thank you for joining us for another Simply Sketched Saturday Challenge! We’re so excited to be sharing this hop with you.  The products used are all available in the current Annual, or seasonal, Stampin’ Up!® Catalogues*.  Simply use the buttons at the bottom of the post to keep hopping!


Its time for another Simply Sketched Saturday Challenge! and another sketch which caused my great difficulty!

Simply Sketched Saturday Stampin Up! Challenge

I very rarely use ribbon on cards, and tying a big bow on the front of a card definitely isn’t me! I did consider changing the bow for a different image, but then couldn’t think of anything to change it to! But I still didn’t want to use ribbon, well then Stampin’ Up!® came to my rescue with the Bow Builder Punch!

Stampin' Up! UK Simple Sketched Challenge Season of Cheer

There are some retiring products on this card, and I really hope you can grab them before they sell out! I’ve LOVED used the Season of Cheer Designer Series Paper featured on the bottom half of this card, its a perfect blend of colours and watercolour effect for the perfect Christmas feel.

The sentiment comes from the Festive Fireside stamp set, also on the retiring list, stamped in Cherry Cobbler, surrounded by a Wreath of Mossy Meadow

Before I go, I have a few Bow Builder Punch Tips!

  • punch all your pieces first (that’s two punches!) and curl them with your bone folder to prevent creases in your bow
  • stick your bow together with glue dots, but attach the completed bow to your project with Tombow Liquid Glue. I also find that my bow holds together better if I add some Tombow to the underside of the bow before I stick it down
  • Stampin’ Up!® have a great video on the assembling the bow on their YouTube channel

Simply Sketched Next

Simply Sketched Previous


Shop Now button-001Join my team button-001

To purchase any of the items featured in my projects please use the links above. To join my team of Stampin’ Friends select ‘Join My Team’ or send me a message!

Please support StampinByHannah, and join my Code Club, by using the Hostess code featured in the top right hand of my blog. For orders of over £150 please do not use this code, as you are entitled to your own Hostess benefits!

Sign up to my newsletter here – http://eepurl.com/2if59

Hannah McCurley

Stampin’ Up! UK Independent Demonstrator

The Perfect Bow….

I think this was the most anticipated item in the new Stampin’ Up! catalogue

The Bow Builder Punch

Perfect baby size bows every single time! Actually, ‘baby sized’ is what Stampin’ Up! describe them as, I would rather think of them as cute. They measure 5.7 x 2.2 cm (2 1/4 x 3/4″) when assembled. They are the perfect size for a A6 card (thats half an A4 folded in half), and are just so sweet.

Stampin' Up! UK Bow Builder Punch

This card is actually a CASE (copy and share everything) from the Stampin’ Up! Spring/Summer catalogue. I have used different papers and changed the sentiment.

The papers I have selected are from the Sweet Dreams Designer Series Paper pack, designed for baby projects. This paper uses a selection of beautiful soft colours; Basic Grey, Crisp Cantaloupe, Hello Honey, Lost Lagoon, Sahara Sand and Whisper White; in both a girly print and something better for boys! I have used the blue ‘boy’ sides for this card, to match the Lost Lagoon card base.

This DSP also matches a selection of Washi taps, cute buttons, and the Little Sunshine stamp set.

But for today, I’ve just used the papers to create these 3 lovely bows.

The punch punches out half a bow, so for each bow you need to punch twice. They are super simple to assemble. My suggestion is to curl the bow sections with your bone folder, and stick them together with Glue Dots.

I grabbed my Zoo Babies stamp set for the sentiment, and completed the card with some hand-drawn faux stitching in Sahara Sand Stampin’ Write Marker.


Hannah Wilks

Stampin’ Up! UK Independent Demonstrator

If you like the project, or any of the products used, would like a catalogue, or to join my team, please contact me, or click on the ‘Shop NOW’ button at the top of the page. You can also find me on Twitter, Facebook, YouTube, Google+, About.me, and Tumblr (Links in the sidebar)

Sign up to our newsletter here – http://eepurl.com/2if59

Thank you for stopping by www.www.stampinbyhannah.co.uk today

x