Product of the Month – Project Life by Stampin’ Up! Cards!

Ok, so this month my Product of the Month is the Seasonal Snapshot Project Life by Stampin’ Up! Card Collection and Accessory Pack.

I LOVE this kits, you get heaps of Project Life cards, stickers, Washi tape, and other fun embellishments, and they are great for documenting family holidays, Christmas, Halloween, etc. But I know there is more that you can do with them than just memory keeping (don’t get me wrong, I love memory keeping! but I know its not everyone’s bag!)


So, I grabbed my kits the other day and made some really cool cards using just the cards in the kit (plus some cardstock for the card bases) and the goodies in the Accessory pack.

Stampin' Up! UK Project Life Thankful for you

Some of the cards in this kit are based around Halloween and Thanksgiving, and although Halloween in growing in popularity, Thanksgiving is definitely an All American Holiday! So I knew I needed to find a different purpose for these cards. I always need Thank You cards (each and every customer that shops with me gets a Thank you), and so I took this lovely spotty 6×4 card and cut it down to 4 x 5 3/4″ to fit my card base, added a strip of Washi tape, a punched Decorative Label, and the Thankful sticker from the Accessory kit. The ‘for you’ is part of a stamp from Good Greetings, I coloured with Tangerine Tango Stampin’ Write Marker and added to the label.

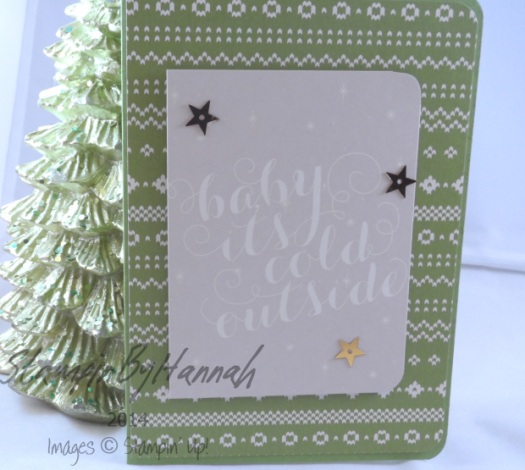
Stampin' Up! UK Project Life Seasonal Snaphot

I love this card! Baby It’s Cold Outside, and I thought it paired beautifully with this Old Olive ‘jumper’ print card! I have rounded the corners with the Project Life by Stampin’ Up! Corner punch, and added some stars from the Accessory pack with some multi-purpose liquid glue.

Stampin' Up! UK Project Life by Stampin' Up! Seasonal Snapshot shaker card

This thought is my favourite of the 3 cards! This card took me ages! I love the look of a Shaker card, but I have never made one (until now!) and I have to say, I’ll be grabbing some foam tape before I make one again! I used a Real Red card base, and added the Old Olive Polka dot print 6 x4 card (cut down a little) to the front, before adhering the red snowflake 3 x4 card to the centre.

The accessory pack comes with 3 of these lovely printed acetate 3 x4 cards, one says Merry Christmas, one has a wood grain print, and the other is Halloween themed. And this Merry Christmas just screamed ‘Shaker card’ to me! I have a little confession to make here, the Sahara Sand frame around the acetate piece is cut using Spellbinders Curved Matting Basics A dies, because that is what I had on hand.

Then came the fiddly part! I really need some foam tape next time because to create the ‘shaker’ you have enclose all those sequins in something! Well, I didnt have foam tape (and now I’m thinking about it, this would have been a great time to use those edge pieces from the Dimensionals!), but I do have a whole heap of foam squares from a well know craft superstore (I wasn’t wasting this many dimensionals! sorry!), and used those to enclose my sequins. So, the Sahara sand frame is attached to the acetate piece, then I stuck foam squares around the edge of the acetate, piled the sequins in the centre of the snowflake card, and stuck the acetate, frame, and foam squares, over the top!

I love the look, and it would be super simple if I had some foam tape!


Hannah Wilks

Stampin’ Up! UK Independent Demonstrator

If you like the project, or any of the products used, would like a catalogue, or to join my team, please contact me, or click on the ‘Shop NOW’ button at the top of the page. You can also find me on Twitter, Facebook, YouTube, Google+, About.me, and Tumblr (Links in the sidebar)

Sign up to our newsletter here – http://eepurl.com/2if59

Thank you for stopping by www.www.stampinbyhannah.co.uk today

x

Christmas Wishes Pocket Project

I do love a cute Christmas make – and this would be great to make for you children and grandchildren to remember why they love Christmas, why Christmas is so special, or to teach them a little bit about the Christmas story.

Before you watch the video, I recorded this a couple of weeks ago (and I forgot all about it!) and so I’m sorry for a waffle at the beginning about the Good Greetings offer which has sadly now ended.


I found a similar looking item in my local Craft Superstore, however, I thought I could totally make something similar at home.

Stampin' Up! UK Christmas Wishes Pocket

The measurements:

Cardstock = 8 x 4 1/2″ (20.4 x 11.5 cm)

A piece of cardstock that measures 3 1/4″ x 3 1/4″ (9.5 x 9.5 cm)

and 10 stripes that measure 3/4″ x 5″ (2 x 12.7 cm)

Score the short side at – 1/2″ and 4″ ( 0.6 and 10.2cm)

Score the short side at – 4 1/2″ (11.5cm)

Now, I think this would be a really cute idea to add to your Project Life or December Daily! but the pocket is too big!

So, to make a pocket which fits your project life: You need a piece of cardstock that measure = 6 1/2 x 4″ (16.5 x 10.2 cm), score the short side at 1/2″ and 3 1/2″ (1.2cm and 9cm), and the long side at 4″ (10.2 cm)


Hannah Wilks

Stampin’ Up! UK Independent Demonstrator

If you like the project, or any of the products used, would like a catalogue, or to join my team, please contact me, or click on the ‘Shop NOW’ button at the top of the page. You can also find me on Twitter, Facebook, YouTube, Google+, About.me, and Tumblr (Links in the sidebar)

Sign up to our newsletter here – http://eepurl.com/2if59

Thank you for stopping by www.www.stampinbyhannah.co.uk today

x
October Favourites!

oct favs - thumbI thought I would share my favourite products and projects from the month of October!


First of all, my favourite project – my desk bin! (check out the instructions HERE!) – I love this thing! it sits on my desk, and collects all of those annoying little bits; red liner tape, the backing from my dimensionals, scraps….. helps me keep my desk clean, tidy and organised (and no, I still haven’t emptied it!

My favourite stamps from October are the Good Greetings set (that were on offer during September and October, and were my pick of the month!) I used this set on everything in October, I love the handwritten font, and there are some lovely sentiments and phrases too

My favourite colour this month was a little bit of a surprise to me! I bought the Subtles Cardstock Collection pack for the first time, and this Marina Mist just jumped out at me, it is just the perfect mid-tone blue! LOVE!

And of course, I couldn’t get through this first Favourites post without mentioning my favourite tool! The Envelope Punch Board! this only arrived in my craft room in October (I dont really know why I hadn’t grabbed it before!) it is just awesome, I have LOADS of crafty projects using this board coming to you really soon!

Thanks for watching and reading, stay tuned for my November Product of the Month, coming really soon!


Hannah Wilks

Stampin’ Up! UK Independent Demonstrator

If you like the project, or any of the products used, would like a catalogue, or to join my team, please contact me, or click on the ‘Shop NOW’ button at the top of the page. You can also find me on Twitter, Facebook, YouTube, Google+, About.me, and Tumblr (Links in the sidebar)

Thank you for stopping by www.www.stampinbyhannah.co.uk today

x

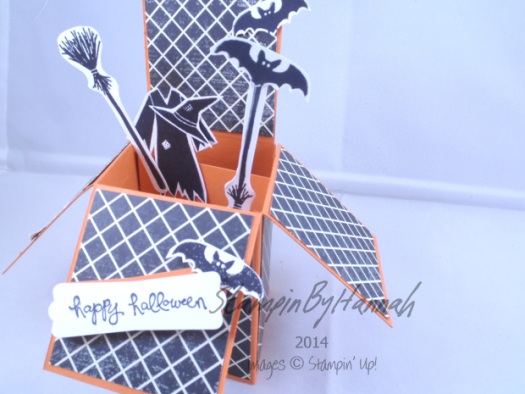
Fancy Fold Friday – Halloween Card in a Box!

Happy Halloween!

and Happy Fancy Fold Friday!

This week I thought I would knock things up a gear and give you a card in a box!

I love these cards! When I’ve made them for people, everyone is always stunned by them!

Stampin' Up! UK Card in a Box Halloween

Isnt it fab!

Ok, So the measurements for this fab project:

Cardstock = 9 x 5 inches (23 x 13 cm) and two pieces measuring 3 x 2″ (8 x 5cm)

DSP = 4 3/4 x 1 7/8″ (12 x 4 1/2cm), 4 pieces that measure 2 x 2 1/8″ (5 x 5.2cm) and 3 pieces that measure 2 x 2 5/8″ (5 x 6.5cm)

Score the Cardstock on the short edge at 2 3/4″ (7cm) and on the long side at 2 1/8″, 4 1/4″, 6 3/8″ and 8 1/2″ (thats every 5.2cm!)

I’ve used Tangelo Twist (I LOVE that orange!) and Flashback DSP for this box, and have fussy cut the images from the Tee-Hee-Hee stamp set for the embellishments! (how cute are those bats!) All the stamping is done using Staz-on Ink

Check the video for full instructions!


DISCLAIMER – I work in Inches, all metric measurements are approximate!

The sentiment used on this card is from Good Greetings – which is still available for FREE with an qualifying order placed before the end of October!

Hannah Wilks

Stampin’ Up! UK Independent Demonstrator

If you like the project, or any of the products used, would like a catalogue, or to join my team, please contact me, or click on the ‘Shop NOW’ button at the top of the page. You can also find me on Twitter, Facebook, YouTube, Google+, About.me, and Tumblr (Links in the sidebar)

Thank you for stopping by www.www.stampinbyhannah.co.uk today

x

Happy Halloween!

Well, almost!

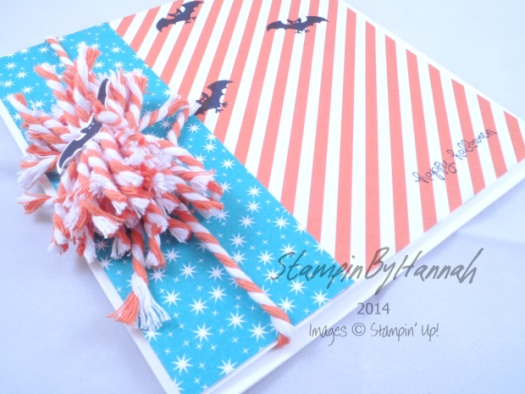
I have a card for you today! and something slightly different – a 6 x 6″ square card!

Stampin' Up! UK Halloween Card thick bakers twine pom pom

Ok, So, this card is made from half a sheet of 12×12 Whisper White cardstock, folded to make a 6 x 6 card base.

The DSP (Motley Monsters!) is cut to 5 3/4 x 5 3/4″, with that lovely Burmuda Bay star print piece cut to 5 3/4 x 2″. I have then stamped the Bats from Tee-Hee-Hee and the sentiment from Good Greetings in Staz-on Ink – to get that true Black!

Then we get to the “pom pom”. Now, I followed a YouTube tutorial to make a Bakers Twine pom pom for this – but really, its nothing like a pom pom! I dont know if I just didnt have enough twine, or if I’ve make some sort of mistake along the way, but this is what I have! I actually quite like it! It means though, that this is definitely a ‘hand deliver’ sort of card!

To create the ‘Pom Pom’:

I took a length of Thick Bakers Twine (this one is White and Tangerine Tango!) and wrapped it around 3 of my fingers. Tied the middle together with white bakers twine, and snipped all the ends. I’ve attached it to the card with some more Thick Bakers Twine, and covered the tied middle with a fussy cut Bat!

Hope you like the card for today – check out the blog of Friday for a super cool Fancy Fold Friday Halloween Card!


Hannah Wilks

Stampin’ Up! UK Independent Demonstrator

If you like the project, or any of the products used, would like a catalogue, or to join my team, please contact me, or click on the ‘Shop NOW’ button at the top of the page. You can also find me on Twitter, Facebook, YouTube, Google+, About.me, and Tumblr (Links in the sidebar)

Thank you for stopping by www.www.stampinbyhannah.co.uk today

x

So thankful for you!

Hello!


I thought I would take a step away from Christmas just for a moment! To say thanks!

Last week I featured the Festival of Trees Stamp Set (still not sick of that set yet! I just LOVE it!), and had such a great response from all of you (both here and on facebook!) and just wanted to say thanks to all of you!

Stampin' Up! UK Calypso Coral Good GreetingsI love bright colours, and rich colours, really I just love colour! but coral isn’t really my colour. So, when I looked through which ink pads I didn’t own a few weeks ago, it wasn’t a surprise to me that Calypso Coral hadn’t worked its way into my basket. But all of the Stampin’ Up! colours are just so beautiful I decided to take a chance on the coral!

How cute is this colour! It’s definitely on the orange spectrum, but its so soft and pretty! and please tell me, what is prettier than butterflies and flowers! So, I grabbed the Papillon Potpourri stamp set, and I Like You (hostess set), along with our Product of the Month – Good Greetings! and stamped this card!

There are actually two butterflies here, I punched one butterfly out of Calypso Coral DSP from the Subtles Designer Series Paper Stack, and then added the stamped and punched butterfly over the top with a single Glue Dot to give some great dimension!

I am so Thankful for you! Thanks so much for all your comments and orders. Check out my Facebook page HERE! and shop HERE!


Hannah Wilks

Stampin’ Up! UK Independent Demonstrator

If you like the project, or any of the products used, would like a catalogue, or to join my team, please contact me, or click on the ‘Shop NOW’ button at the top of the page. You can also find me on Twitter, Facebook, YouTube, Google+, About.me, and Tumblr (Links in the sidebar)

Thank you for stopping by www.www.stampinbyhannah.co.uk today

x

12 Tags of Christmas – Merry and Bright!

Hello!

Welcome to another instalment of the 12 Tags of Christmas!

This week I used the Good Greetings stamp set (still FREE on any order of £200! until the end of October!) and the Under the Tree Tag a Bag Accessory kit!

Stampin' Up! UK 12 Tags of Christmas

I just love the Tag a Bag Accessory Kits, we have several over the annual and seasonal catalogues. They are just so handy, and include 10 gift tags for just £7.25! Awesome!

So, this tag also uses two pieces of DSP; the green is a piece of Under the Tree Specialty DSP, with the brown being from the Trim the Tree paper stack. I love both these packs of DSP! The specialty paper is really thick (and is awesome for boxes and 3D items) and the little paper stacks are super handy for card fronts and other cute projects (hint hint!)

Stampin' Up! UK Scallop Tag Topper Punch


So, to create this tag. The green piece of 2″ x 6″ and punched using the Scallop tag topper punch. And the brown piece is 2″ x 3″ and punched with the same punch. The sentiment from that Good Greetings set, is stamped on one of the builder tags from the Tag a bag accessory kit, attached with a dimensional. Instead of using twine or ribbon this week, I’ve used one of the pegs from the Tag a bag accessory kit – they are just so cute!


Hannah Wilks

Stampin’ Up! UK Independent Demonstrator

If you like the project, or any of the products used, would like a catalogue, or to join my team, please contact me, or click on the ‘Shop NOW’ button at the top of the page. You can also find me on Twitter, Facebook, YouTube, Google+, About.me, and Tumblr (Links in the sidebar)

Thank you for stopping by www.www.stampinbyhannah.co.uk today

x

Give Thanks!

Before we get into our card for today I just want to quickly remind you of the Stampin’ Up! offers available at the moment!

Of course there are this weeks Weekly Deals! and that lovely FREE Stamp set! (check HERE for more on that one!)

But its the joining offer I really want to talk to you about!


Stampin' Up! UK Pick a pack of Paper DSP Designer Series PaperJoin Stampin’ Up! before the end of the month to receive a FREE pack of Designer Series paper every month for 6 months! That’s £60 of FREE stock! I love our DSP, its just such a lovely weight, and of course they all coordinate with everything in both the Annual Catalogue AND the seasonal catalogue (and supplement – more on that tomorrow!). As well as the free DSP, Stampin’ Up! also provide demonstrator with other FREE items for meeting various targets! Did I mention that this month I earned 2 FREE stamp sets! Just for meeting my sales goals for the first 3 months of being a demonstrator! and it was really easy! Thanks to everyone who has chosen me to be their Stampin’ Up! demonstrator, I love you all!


Right, Card!

Stampin' Up! UK I like you Stampin Write Markers


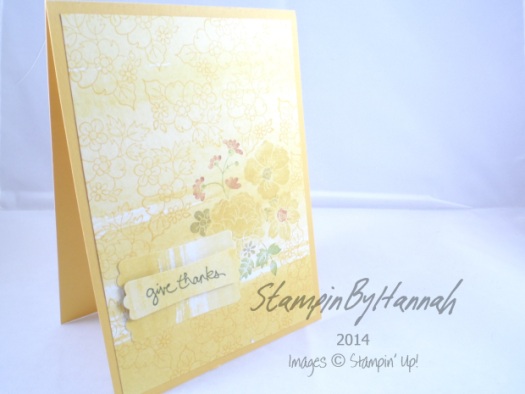
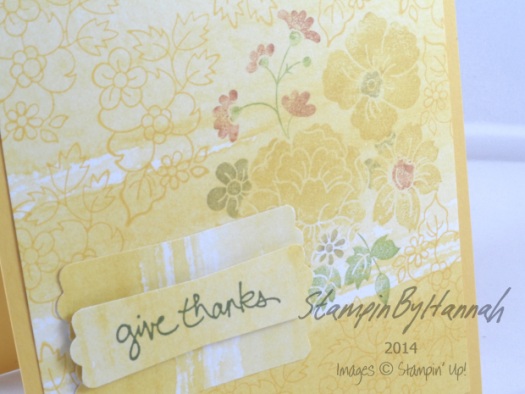
This card uses a Crushed Curry Card base, and a piece of Colour Me Autumn DSP (the colours in this pack of DSP are gorgeous – Blackberry Bliss, Crushed Curry, Mossy Meadow, Cajun Craze, Old Olive! <3). I stamped the DSP with Crushed Curry ink using the Hello Darling Stamp set (one of the ones I chose as my freebies!).

I coloured the Flower stamp with my Stampin’ Write Markers in Crushed Curry, Cajun Craze, and Old Olive, before stamping onto the DSP


Stampin' Up! UK I like you Stampin Write Markers


The sentiment for this card comes from the FREE good greetings stamp set, stamped in Mossy Meadow onto the same DSP, and punched out using the Modern Label Punch, layered with two other punched pieces

I didn’t think Crushed Curry was really going to be my colour! Boy, was I Wrong!


Hannah Wilks

Stampin’ Up! UK Independent Demonstrator

If you like the project, or any of the products used, would like a catalogue, or to join my team, please contact me, or click on the ‘Shop NOW’ button at the top of the page. You can also find me on Twitter, Facebook, YouTube, Google+, About.me, and Tumblr (Links in the sidebar)

Thank you for stopping by www.www.stampinbyhannah.co.uk today

x


October Product of the Month!

Hello!

sorry this post is a little late (you’ll understand why over the next few days! *world card making day is on saturday!*)

But I’m back to announce the StampinByHannah Product of the Month for October!

Stampin' Up! UK Good Greetings FREE Stamps

This stamp set – Good Greetings! – is a set of 19 gorgeous handwritten style sentiment stamps, Perfect for your holiday cards over the next few months! It covers Christmas and New Year, Halloween, Valentines, and also includes a number of generic sentiments too! I love this stamp set, its so handy!

However, you wont find this set in the catalogue! Good Greetings is available to you, for FREE! when you either: place an individual order of more than £200, or host a party which exceeds £200! AND its only available until the end of October!

So you better be quick, grab your today!

I have lots of projects coming up over the next few weeks featuring Good Greetings, so subscribe to the blog now so you don’t miss anything – believe me I have lots of new projects and ideas coming this way very soon!


Hannah Wilks

Stampin’ Up! UK Independent Demonstrator

If you like the project, or any of the products used, would like a catalogue, or to join my team, please contact me, or click on the ‘Shop NOW’ button at the top of the page. You can also find me on Twitter, Facebook, YouTube, Google+, About.me, and Tumblr (Links in the sidebar)

Thank you for stopping by www.www.stampinbyhannah.co.uk today

x