You Brighten My Day

Sale-a-bration is the 3 month long BIG sale from Stampin’ Up! Finishing on 31st March 2015, it gives you a choice of 14 FREE items to choose from when you order £45, and each £45 spend gives you an extra item – so if you spend £90 you choose 2 gifts, £130 – 3 gifts etc. etc. Check out my Sale-a-bration page for more information!


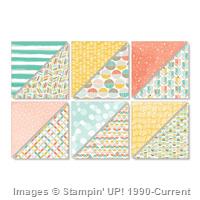
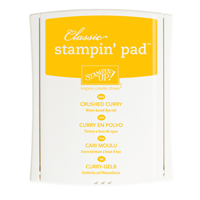
A bit more Bokeh today! (maybe I should have called this Bokeh week!) using the Best Year Ever Designer Series Paper, with the You Brighten My Day Stamp set.

Stampin' Up!UK saleabration you brighten my day

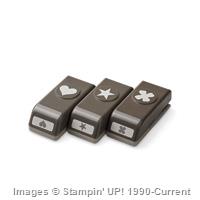
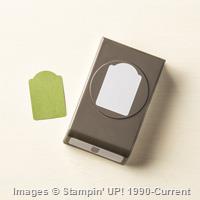
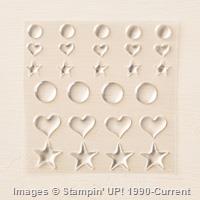
Those hearts are so cute! I love it when stamps and punches coordinate – don’t you. These stamps match perfectly with the Itty Bitty Accents punch pack, and the made image is punched out with that super cute Note Tag punch.

A simple card on a Saturday – Now, that doesn’t happen every week!

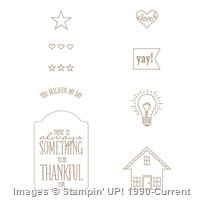
This beautiful stamp set could be yours for FREE when you order £45! LOVE it!


Hannah Wilks

Stampin’ Up! UK Independent Demonstrator

If you like the project, or any of the products used, would like a catalogue, or to join my team, please contact me, or click on the ‘Shop NOW’ button at the top of the page. You can also find me on Twitter, Facebook, YouTube, Google+, About.me, and Tumblr (Links in the sidebar)

Sign up to our newsletter here – http://eepurl.com/2if59

Thank you for stopping by www.www.stampinbyhannah.co.uk today

x

Sale-a-bration on Sunday – Stamping with Irresistibly Yours!

Welcome to another Sale-a-bration on Sunday!

A few weeks ago I demonstrating watercolouring on the Irresistibly Yours Designer Series Paper, and well, today I thought I would try stamping on it!

Stampin' Up! UK Sale-a-bration SAB stamping irresistibly yours flowers

I selected the stripy paper from the Irresistibly Yours Designer Series Paper pack, and stamped on it using the Something Lacy background stamp from the Spring/Summer catalogue, in Marina Mist ink. I just love the effect of this, and think it would look lovely with the Dictionary stamp or Positively Chevron

The flower is a series of flowers stamped and punched from Petite Petals, Flower Shop and Petal Potpourri, punched with the coordinating punches. I spotted this layer flower on another blog (I wish I could remember who’s, if it was you please leave a comment below) and just thought it was such a good idea! and so pretty.

The sentiment is from Crazy About You!


Hannah Wilks

Stampin’ Up! UK Independent Demonstrator

If you like the project, or any of the products used, would like a catalogue, or to join my team, please contact me, or click on the ‘Shop NOW’ button at the top of the page. You can also find me on Twitter, Facebook, YouTube, Google+, About.me, and Tumblr (Links in the sidebar)

Sign up to our newsletter here – http://eepurl.com/2if59

Thank you for stopping by www.www.stampinbyhannah.co.uk today

x

Ambassador’s Chocolate box! using Stampin’ Up! UK products – video Tutorial

I love taking packaging as inspiration for handmade projects, a few weeks ago I was shopping with a friend and spotted a long thin box of chocolates, and just knew I had to buy it and re-create it. Now, that box wasn’t all that exciting, but using an existing box makes it much easier to re-engineer a box to fit the same items! So, the original box held 5 chocolates, my version holds 3, but I think 3 of these indulgent chocolates is enough!

Stampin' Up! UK Ferrero Rocher box chocolate video tutorial

I have made this box a few times now, with punched out sections, and designer series paper, but may favourite has to be this Brushed Gold version. The photo doesn’t do the colour of this cardstock justice, but I think I managed to capture the shine in the video.

I also grabbed one of the new wedding themed stamp sets from the Spring/Summer catalogue for the stamped sentiment – Your Perfect Day, punched out perfectly (pun intended) with the 1 1/4″ circle punch. I just love the look of these two punched layered on top of each other, the bottom layer is a 1 3/8″ circle punched from Blackberry Bliss cardstock (love that colour!)

Measurements:

Cardstock = 8 1/4 x 6 1/2″ (21 x 17 cm)

Score on the long side first at – 1/2, 2, 6 1/4 and 7 3/4″ (1 , 5, 16, and 20 cm)

Score on the short side at 1/2, 2, 3 1/2 and 5″ (1, 5, 9, 13 cm)

Measurements for Designer Series Paper:

4 pieces cut to 1 1/4 x 4″ (3 x 10 cm)

2 pieces cut to 1 1/4 x 1 1/4″ (3 x 3 cm)


Hannah Wilks

Stampin’ Up! UK Independent Demonstrator

If you like the project, or any of the products used, would like a catalogue, or to join my team, please contact me, or click on the ‘Shop NOW’ button at the top of the page. You can also find me on Twitter, Facebook, YouTube, Google+, About.me, and Tumblr (Links in the sidebar)

Sign up to our newsletter here – http://eepurl.com/2if59

Thank you for stopping by www.www.stampinbyhannah.co.uk today

x

The Perfect Bow….

I think this was the most anticipated item in the new Stampin’ Up! catalogue

The Bow Builder Punch

Perfect baby size bows every single time! Actually, ‘baby sized’ is what Stampin’ Up! describe them as, I would rather think of them as cute. They measure 5.7 x 2.2 cm (2 1/4 x 3/4″) when assembled. They are the perfect size for a A6 card (thats half an A4 folded in half), and are just so sweet.

Stampin' Up! UK Bow Builder Punch

This card is actually a CASE (copy and share everything) from the Stampin’ Up! Spring/Summer catalogue. I have used different papers and changed the sentiment.

The papers I have selected are from the Sweet Dreams Designer Series Paper pack, designed for baby projects. This paper uses a selection of beautiful soft colours; Basic Grey, Crisp Cantaloupe, Hello Honey, Lost Lagoon, Sahara Sand and Whisper White; in both a girly print and something better for boys! I have used the blue ‘boy’ sides for this card, to match the Lost Lagoon card base.

This DSP also matches a selection of Washi taps, cute buttons, and the Little Sunshine stamp set.

But for today, I’ve just used the papers to create these 3 lovely bows.

The punch punches out half a bow, so for each bow you need to punch twice. They are super simple to assemble. My suggestion is to curl the bow sections with your bone folder, and stick them together with Glue Dots.

I grabbed my Zoo Babies stamp set for the sentiment, and completed the card with some hand-drawn faux stitching in Sahara Sand Stampin’ Write Marker.


Hannah Wilks

Stampin’ Up! UK Independent Demonstrator

If you like the project, or any of the products used, would like a catalogue, or to join my team, please contact me, or click on the ‘Shop NOW’ button at the top of the page. You can also find me on Twitter, Facebook, YouTube, Google+, About.me, and Tumblr (Links in the sidebar)

Sign up to our newsletter here – http://eepurl.com/2if59

Thank you for stopping by www.www.stampinbyhannah.co.uk today

x

Happy New Year!

This is likely to be a long post! be warned!

Firstly, Happy New Year! I hope its a good one!

Before we get into the project today, I am going to waffle about some important changes here at StampinByHannah!

StampinByHannah Rewards programme – I have decided to offer shopping gifts (in addition to any rewards from Stampin’ Up!) please check out the StampinByHannah Rewards page in the menu bar at the top (its under Shop NOW!). In a nutshell, I will be offering free gifts depending on your total amount spent with me, this means that you can order several orders and they will ALL count towards your rewards. I will be offering a sort of points system (think of a large supermarket chain!), and I will automatically send you your gifts when you reach each amount – some do require you to make a choice, but I will email you with all the information when you reach each marker.

– Sale-a-bration – Sale-a-bration starts next week on the 6th of January! keep watching for more information about FREE products and extra shopping offers!

– Facebook – Go over to StampinByHannah on facebook to make sure you stay up to date with all my personal offer and events!

– Events! – I am now holding monthly classes – please check out the Events page for my complete calender! all classes are also available in a virtual format if you are unable to attend.


Right, I think that’s all the notices for now, lets get to the card for today!

Any guesses on my inspiration here!

Stampin' Up! UK Petite Petals Pootles Gorgeous Grunge

I love petite petals! LOVE LOVE LOVE! and this stamp set combined with the matching punch and Rich Razzleberry just called out to me this week!

There is a stamped layer of Gorgeous Grunge on the Whisper White cardstock, and the flowers are added on top.

There are actually three different flowers here, one stamped on Whisper white, one on Rich Razzleberry and one plan with sponge edges – all using Rich Razzleberry ink! All the flowers are added with glue dots, and the sponged ones are finished with Candy Dot centres!

A super effective, super quick make!


Hannah Wilks

Stampin’ Up! UK Independent Demonstrator

If you like the project, or any of the products used, would like a catalogue, or to join my team, please contact me, or click on the ‘Shop NOW’ button at the top of the page. You can also find me on Twitter, Facebook, YouTube, Google+, About.me, and Tumblr (Links in the sidebar)

Sign up to our newsletter here – http://eepurl.com/2if59

Thank you for stopping by www.www.stampinbyhannah.co.uk today

x

DIY Wreath Card

Wreaths appear to be a BIG trend this year when it comes to Christmas (or actually any holiday / event!), and Stampin’ Up! have an amazing Wreath stamp set (and matching framelits) which is just gorgeous, but I decided that I would make my own!Stampin' Up! UK DIY Wreath Christmas


This card uses a Real Red Card base, with Old Olive and Whisper White Card matts. I used the Itty Bitty Accents Punch Pack Flower punch to make the flowers for the wreath in Old Olive and Real Red, before arranging them in a sort of circle and attaching them using Glue Dots – Super Simple to make but really pretty

Stampin' Up! UK DIY Wreath christmas punch

The sentiment is one from the Holiday Home stamp set (sorry, this stamp set is used a LOT in the coming weeks!)

LOVE!

Hannah Wilks

Stampin’ Up! UK Independent Demonstrator

If you like the project, or any of the products used, would like a catalogue, or to join my team, please contact me, or click on the ‘Shop NOW’ button at the top of the page. You can also find me on Twitter, Facebook, YouTube, Google+, About.me, and Tumblr (Links in the sidebar)

Sign up to our newsletter here – http://eepurl.com/2if59

Thank you for stopping by www.www.stampinbyhannah.co.uk today

x

Fancy Fold Friday – Scallop Tag Topper Card

Hello!

This is a joint post with my other website – www.thehandmadeweddings.co.uk.

I love making wedding stationary, but a standard card can be a little bit dull, and I love making these!

It uses my favourite Scallop Tag Topper punch, yes I really do use it all the time!

Stampin' Up! UK Scallop tag topper punch wedding card


Measurements:

Cardstock = 8 1/4 x 5 3/4″ (21 x 14.5 cm)

Mark your halfway point on the short sides of your cardstock – approximately 2 7/8″ (7.3 cm) and use these as guide marks when using your scallop tag topper punch

Score one of the tags where it joins the card, and fold.

Score the main card at 4 1/4″ (10.8 cm)


Insert measures – 3 7/8 x 5 1/2 ” (10 x 14 cm)

Card matt measures – 2 1/4 x 5 1/2″ (5.5 x 14 cm)


For more information and to see the complete Wedding invitation collection visit – www.thehandmadeweddings.co.uk


Hannah Wilks

Stampin’ Up! UK Independent Demonstrator

If you like the project, or any of the products used, would like a catalogue, or to join my team, please contact me, or click on the ‘Shop NOW’ button at the top of the page. You can also find me on Twitter, Facebook, YouTube, Google+, About.me, and Tumblr (Links in the sidebar)

Sign up to our newsletter here – http://eepurl.com/2if59

Thank you for stopping by www.www.stampinbyhannah.co.uk today

x

An Itty Bitty Bit Shimmery

Have you take a look at the Paper Basics Page of the Annual Catalogue? No?! well, then you have missed out! I LOVE this page! you can find it on page 192, and its where you can find all the cool papers and cardstocks; vellum, Kraft cardstock, watercolour paper, glimmer page and what I am using today – Shimmery White cardstock!

Stampin' Up! UK shimmery white card

This photo does not do this cardstock justice! it is gorgeous!

This is a top folding card, half a piece of A4 folded in half, with a card matt cut slightly smaller and embossed using my Simply Scored! to get long embossed lines like a frame. The off cuts of the Shimmery White cardstock were cut to 1 1/2″ squares, and I used my Itty Bitty Accents punch pack to punch the shapes, before layering them with some scraps of Melon Mambo!

cool huh!


Hannah Wilks

Stampin’ Up! UK Independent Demonstrator

If you like the project, or any of the products used, would like a catalogue, or to join my team, please contact me, or click on the ‘Shop NOW’ button at the top of the page. You can also find me on Twitter, Facebook, YouTube, Google+, About.me, and Tumblr (Links in the sidebar)

Sign up to our newsletter here – http://eepurl.com/2if59

Thank you for stopping by www.www.stampinbyhannah.co.uk today

x

12 Tags of Christmas – Under the Tree

Welcome to another 12 Tags of Christmas!

This week I used the Under the Tree Specialty Designer Series Paper – a wonderful heavy cardstock weight paper that is amazing for boxes and packaging, but has a hidden feature!
Stampin' Up! UK 12 Tags of Christmas Under the TreeOk, so, this tag is 6″ x 2″, and punched with the Scallop Tag Topper Punch.

The Under the Tree paper is coloured on one side, and kraft with a white pattern on the other. For this tag I used the Kraft side, and inked the tag with Old Olive Ink and a sponge. The white printed pattern acts as a resist, meaning that the Kraft cardstock takes the colour of the ink, but the pattern doesn’t! (this sort of thing always reminds me of some Tim Holtz products, and just screams to ink and spritz and alter). I then stamped the snowflake stamp from Trendy Trims in Early Espresso ink.

The tag was then finished with the Natural and Old Olive Two-Tone Trim (extra chunky bakers twine! LOVE!)


So, check back next time for another installment of our 12 Tags of Christmas!

and sign up for the StampinByHannah newsletter by hitting the Subscribe to Newsletter button —->

Hannah Wilks

Stampin’ Up! UK Independent Demonstrator

If you like the project, or any of the products used, would like a catalogue, or to join my team, please contact me, or click on the ‘Shop NOW’ button at the top of the page. You can also find me on Twitter, Facebook, YouTube, Google+, About.me, and Tumblr (Links in the sidebar)

Thank you for stopping by www.www.stampinbyhannah.co.uk today

x


Fancy Fold Friday – Centre Step Card

Hello! Welcome to another Fancy Fold Friday!

This card was so complicated! I very very nearly gave up with it all together, and I’ve got to say that the DSP dimensions were pure luck! However, i decided I would share the basic structure of the card with you.

Stampin' Up! UK Centre Step Card

This card uses Pool Party Cardstock cut to 8 1/4″ by 5 3/4″. You’re going to need to grab that Stampin’ Trimmer for this one! Cut two lines in the card stock, the first at 1 3/4″ from 1 3/4 to 4 3/4″ and then at 4 1/4″ from 1 3/4 to 4 3/4″. This should give you two slits in your piece of card. Then score along the long edge at 2″, at the start of the two slits (between the two slits ONLY!), at 4 1/8″ either side of the cuts, and between the two slits at 5 3/4″ and at the end of the slits.

Stampin' Up! UK Centre Step Card

This card also features stamps from Blooming with Kindness and Petite Petals (along with the Petite Petal punch) and the Sentiment is punch using the Decorative Label Punch

Let me know in the comments below if you want a video tutorial on some of the fancy folds featured as part of Fancy Fold Friday!

See you again next week

x


Hannah Wilks

Stampin’ Up! UK Independent Demonstrator

If you like the project, or any of the products used, would like a catalogue, or to join my team, please contact me, or click on the ‘Shop NOW’ button at the top of the page. You can also find me on Twitter, Facebook, YouTube, Google+, About.me, and Tumblr (Links in the sidebar)

Thank you for stopping by www.www.stampinbyhannah.co.uk today

x